Using
Splashkit
Creating
a Window:
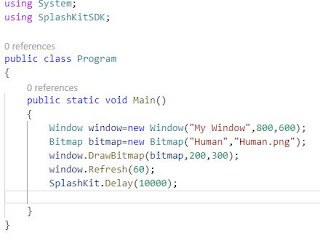
In Splashkit, window is used to create and
manage the graphics. Window is a class in C# and required to pass the title of
the window, height and width. An example is shown below.
Every C# program will be executed from the
main method(), and while creating the object of the window as discussed title
of the window, width and height were passed.
Splashkit provides Delay which puts the
running program in sleep for a specified number of milliseconds. In the above
program, Delay was given 10000 milliseconds. Hence, the window will be displayed
to that amount of time.
As the code does not contain any thing to
display on the window, so, it will appear blank.
To run the open the terminal ,write and run the bellow command.
Ø dotnet run
which will open the above window and delays
for 10 seconds.
The code shows different shapes which can
be drawn on to the window. We need to pass the co-ordinates of window to draw
the image in that particular location.
There are many shape drawing procedures in
the Splashkit, each procedure take values based on their requirement.
Drawing
Bitmap on Window:
Bitmap is a small image which can be
displayed on the window. Bitmap is a class which takes name and image name
while creating an object.
>skm resources.
Which generates folders for database, image, sound etc. Through this, we can access the images into the program. and displays as
User Interactions and Events:
In Splashkit, user can interact with the window using ProcessEvents. This checks both the keyboard and mouse states. ie., when the user types a key or press mouse button then event will be triggered.
Some example of mouse and keyboard events are
1. MouseClicked()
2. MouseDown()
3. MouseMovement()
4. MouseUp()
5. KeyUp
6. KeyDown()
Key events are accessed by attribute KeyCode. i.e.,
Splashkit.KeyDown(KeyCode.UpKey)
The above method will trigger the event when the Up key is pressed.
Collisions in Splashkit:
This library in Splashkit will determine the occurrence of a collision. This library is mainly used for creating the games.
There are number of Collision detecting method but in this, we will cover main topics.
1. bitmap and circle collision. This will detect the collision happened between bitmap and circle.
syntax: public bool BitmapCircleCollision(Circle,Bitmap)
this will return true if there is any collision between circle and bitmap.
2. bitmap collision.
syntax: public bool BitmapCollision(Bitmap1,Bitmp2)
this will return if there is any collision between two bitmaps.
3. CircleCollision
syntax: public bool CircleCollision(Circle1,Circle2)
this will return if there is any collision between two circles.


No comments:
Post a Comment